A/B Testing is a revolutionary technique for digital marketing, and a game-changer for testers to add value to the product directly.
A/B testing, which is also known as Split testing or Bucket testing is an experimentation technique used to assess the usability of a certain feature. It is usually conducted on two or more variants of the same application assigned to different user bases. It helps to identify the user interest, hence, helping the product to be more improvised as per the user’s needs.
Why do you need A/B testing?
Before going into that, let’s discuss how a product becomes more popular and usable. How do you get new opportunities in your business? How can you make it more profitable? The answer lies in the effectiveness of the product, and it’s matchless marketing; using your marketing strategies in the right way is what sets a product apart.
Now, the question is, how do we identify the best usable version of a product? That’s where the concept of A/B testing comes in. It’s simple – you can’t wild-guess the expected response. You will need enough real user data to understand the perspective of your audience. You run different experiments on different user bases to find out which is the best way to go. Then, you can evaluate your conversion funnel and marketing campaign to get data directly from your customers.

How do you plan an A/B test?
A/B Testing can be carried out on both web & mobile applications. For a certain feature, screen, webpage, or app, two or more variants are created, each with a different experimental feature. It could be a design-based experiment, functional experiment, or an experiment for optimizing clicks & conversions.

Today, we are going to look at some easy steps to get you started with split testing on the right foot, even if you can’t hire a professional to help you out.
- Identifying areas of visitor activity
First, we need to identify the areas of visitor activity that are to be improved. For instance, an e-commerce website analyzed the user traffic & found out that users visit the app, add items in their cart but a major chunk of users leaves the site when it asks to sign-up. So, the registration flow is where we need to improve in order to gain more customers and lower the dropout rate. - Create variants on the basis of the hypothesis
Taking the example of a registration flow for the hypothesis, we work on two possible solutions. One flow uses emails to register while the other uses phone numbers. This would be an experiment on ways to register. Another experiment could be on the input fields of the registration form – one form could contain fields that require the user to enter personal information, while the other form takes credit/debit card or COD information only. These were examples of two different approaches to create two different variants. Variants can be multiple, and totally different in nature and objective. - Create user bases for variants
Once the variants are created, the next step is to create different user bases. A user base is actually a group of users generally categorized on the basis of similar interests or causes. For instance, one group could be the users who opt for COD (cash on delivery) and another group could be those who prefer paying through credit/debit card. You can also group users on the basis of demographics, such as age, region, profession, etc. - Testing variants with funnels
In order to get statistical data, we need to create funnels before testing the user activity. These funnels are like checkpoints in your application to monitor the traffic. - Choosing the right variant
Analysis is the key. After all the data has been gathered, we need to analyze the results for making the right variant choice. The data is now systematically organized, plotted, metricized, and driven to a conclusion. The decision would be made on a win-win variant.

Boost your bottom line through A/B testing
Accurate and well-planned A/B tests can greatly improve your bottom line. Controlled experiments and the resulting data can help you figure out the exact marketing strategies that work best for your business. You are more likely to emphasize conducting A/B tests before running ad campaigns and promotions when you continually see that one variant performs one, two, three, or even four times better than the other. It’ll help you decide what works best and what doesn’t, so you can optimize your products, applications, and content accordingly.
When you know what works well, it makes it easier for you to make decisions so you can craft more meaningful and impactful marketing collateral from the beginning. The key is to keep testing regularly so you can stay updated with what is effective for you. Remember, since the technology industry changes rapidly, the trends change as well. This means, what may work for you in one month, may not work as well in the next month. The effectiveness of a test change over time, so it’s important to continue testing regularly.
Here are some tips to help make your A/B tests more effective and impactful:
- Test the right elements
Designs & layouts, headlines & copy, forms, CTAs (Call to action), images, audios & videos, subject lines, product descriptions, social proofs, email marketing, media mentions, landing pages or navigations, etc. - Achieve milestones
Improved conversion rates, more user traffic, higher number of views or subscriptions, increased number of downloads, improved sales, improved time on page, etc. - Carry out multiple iterations
A/B testing is not a one-time activity. It needs multiple iterations when experimenting with a variant. Ultimately, this will lead to a divergence or convergence point through metrics. - Select the right tool
Identify the tool which best fits your testing experiment. Different testing tools provide different kinds of testing expertise. You just have to choose the one which matches your requirement.
Which tools are the best for A/B testing?
It is essential to select the right tool with features to suit your experiment requirements. There are many tools available on the internet, both free and paid. Some of the more popular tools are:
- Optimizely
- VWO
- Convert Experiences
- SiteSpect
- AB Tasty
- Sentient Ascend
- Google Optimize
- Apptimize (for mobile apps)
Let me give you a quick walk-through of one of these tools, Google Optimize (free) to help you better understand how you can set it up to gather meaningful data and drive results that can help boost your business.
How to setup Google Optimize for A/B testing?
- To start, you need to set up an account on Google Optimize. After logging in with your existing Google account (or creating a new one), it will ask you to add a browser extension. This will set up a container.

2. Start with creating an experiment. I have chosen a sample site, and my hypothesis is that the main page heading should be something catchy in order to get more conversions.
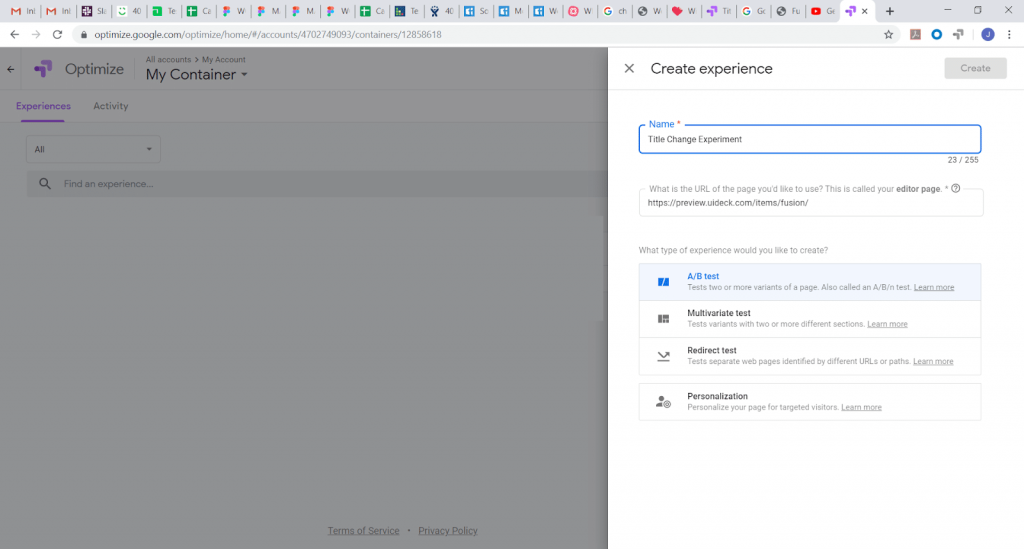
3. After adding the target URL, I’ll proceed to create variants. I made one variant where I changed the title and text of a button, and here we go:
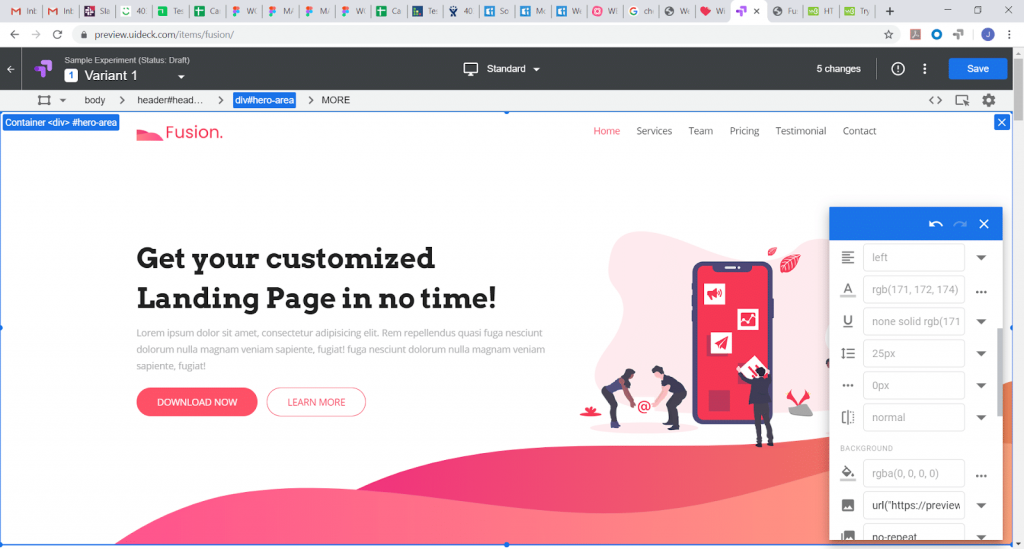
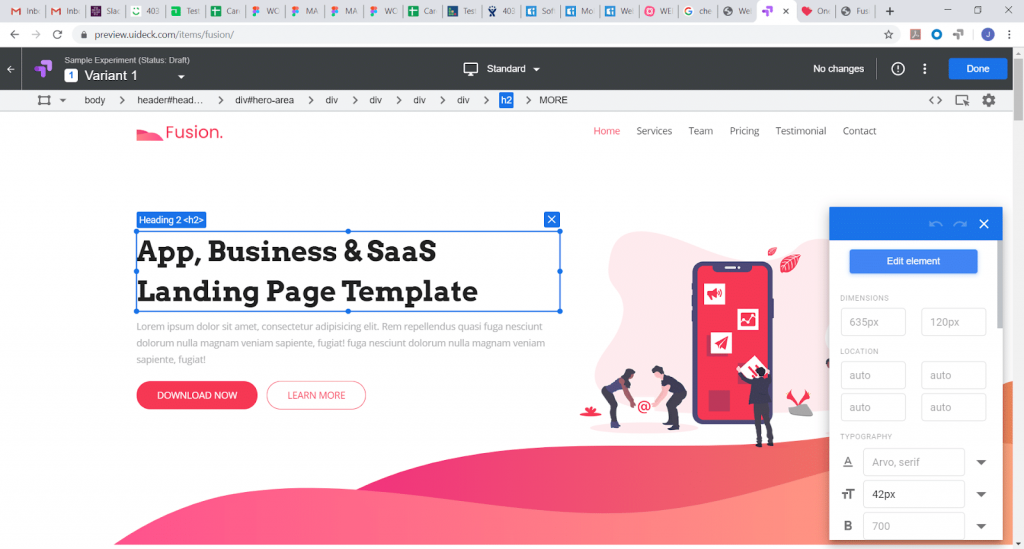
4. Select the target audience. Google Optimize offers various options for this purpose:

5. Google Optimize uses Google Analytics to gather the user data.
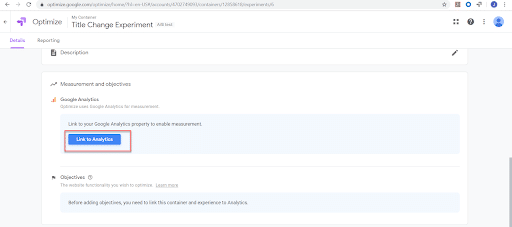
After you link your changes to analytics, next step is to deploy your code:
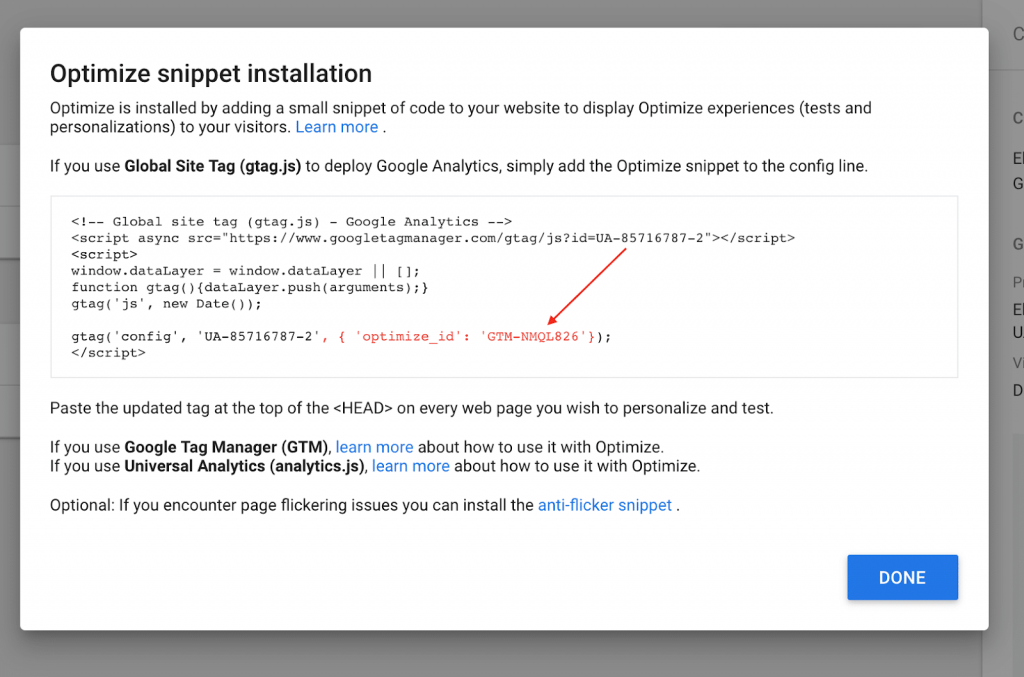
6. Setting the objective as ‘Improve conversion rate’, we’ll proceed to further Settings.


7. After the experiment has been rolled out for a certain time span and for the targeted user base, it’s time to find out the winner of the experiment. The reporting tab will help you to view the results:

NOTE: The above demonstration is just a quick overview. Google Optimize is itself a very thorough tool to work with. In order to explore it more, here is the link to view a short web series on this tool, which is really helpful.
Mistakes to avoid when performing an A/B test
- Use original and valid hypothesis & statistics
Setting invalid hypotheses & using someone else’s app statistics to derive your app hypothesis can weaken your experimenting ground. The results might not be that helpful, hence wasting the time & effort to carry it all the way. - Tackle one pain point at a time
Avoid using too many testing elements together in a test. It might affect the accuracy of the results. Break the elements into smaller groups & pick one at a time. - Consider internal & external factors
Using unbalanced traffic, picking incorrect duration, and not considering the external factors can be the reason for the failure of your experiment. These indicators play a pivotal role in this activity hence need to be taken care of. - Use the right tool
Not using the right tool can be a risk too. The tools are customised for various purposes. Proper research and selecting the best fit is what makes it effective.
Wrapping up
Today, many industries are using A/B testing as a powerful tool to increase the audience viewership, subscription, and readership. Most talked about are Netflix, Amazon, Discovery, Booking.com, WallMonkeys, Electronics Arts (SimCity 5), Careem, etc. There are numerous other multi-domain industries which are using the A/B testing technique to get the best possible results.
If you’re looking to get started with A/B testing, you can set up a call with us and our experts will guide you about outsourcing A/B testing and easily reaping the results without investing your time or efforts.
Pumped up to get started with your first A/B test? Awesome!
Don’t forget to share this blog and help spread the awesomeness!


